
(Figure 1)
The goal of this tutorial is to give you a quick crash course on the Riot API, JSON, and how you can make some basic calls to it. As long as you have done some basic programming and/or scripting you should be able to follow along! This is a tutorial for beginners, written by a beginner.
Requirements:The reason most of you are here is to build an awesome League of Legends application, but in order to do this you must first understand how the Riot API works and how you can make your program reach it; the rest will be up to your own ingenuity and utilization of the API to build a successful application!
{"teemo": { "id": 35960410, "name": "Teemo", "profileIconId": 0, "revisionDate": 1347299919000, "summonerLevel": 6}}
First, head back over to the API Documentation. As mentioned before each of these headers (champion, game, league, ect..) hold different API methods that you can use to get information. Click the API header Summoner-Vx.x (Fig. 1).
(Figure 1)
You will now see a few sub-headers, such as: /api/lol/{region}/vx.x/summoner/by-name/{summonerNames}, and /api/lol/{region}/vx.x/summoner/{summonerIds}. Note the {}, the braces indicate areas that YOU can enter custom information.
For example, {region} indicates that you can specify a specific region (na, euw, ru, global, ect..) for this call, meaning that their request will only get information from that server. In the above API examples, you will also notice braces for items like summonerNames or summonerIds, where you will enter a specific, or list, of summoner names and summoner ids, respectively.
Let’s choose the first sub-header, /api/lol/{region}/vx.x/summoner/by-name/{summonerNames} (Fig. 2).
(Figure 2)
Inside here it will show you WHAT information this specific API can give you. For this API, the items it will return about the summoner name you request is their: ID, Name, Profile Icon ID, Revision Date, and Summoner Level. If you remember our example JSON call above for Teemo, you will see that it shows these exact fields for Teemo’s id, name, profileIconId, revisionDate, and summonerLevel.
{"teemo": { "id": 35960410, "name": "Teemo", "profileIconId": 0, "revisionDate": 1347299919000, "summonerLevel": 6}}
Take a look at some of the other API’s and see what information they can return to you. It will ultimately be your job as the programmer to choose how to utilize these API urls to get the information your application will need.
This wouldn't be a true tutorial without some quick practice! Try out the following.
Head to the API Documentation. Select the Summoner header, and choose the first one, which is /api/lol/{region}/v1.4/summoner/by-name/{summonerNames}
Notice how at the bottom of this section there is a drop down box with regions (na, euw, ru, ect..) and a blank text box. This is a spot where you can practice some API calls and see what you “should” be getting in the JSON, it will also show the Request URL (this is the link that returns your requested information by using your API Key).
Enter in the following names (using region na), one at a time and hit "Execute Request": Teemo, RiotSchmick (Fig. 3).
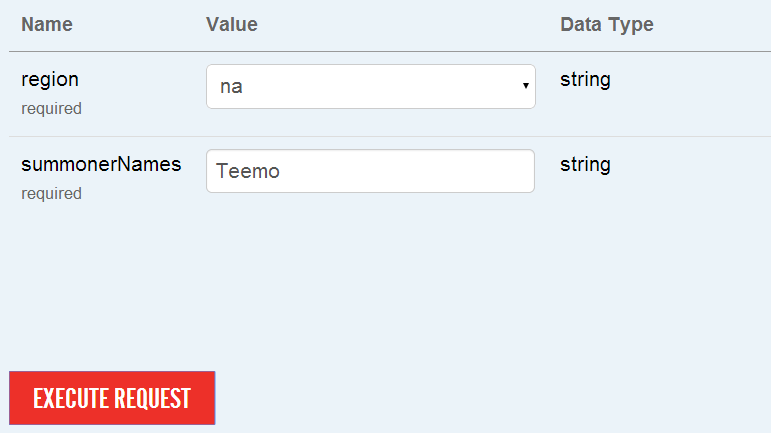
(Figure 3)
You should get the following information within the boxes below.
Teemo
Request URL:
https://na.api.pvp.net/api/lol/na/v1.4/summoner/by-name/Teemo?api_key=YOUR_API_KEY
Response Body:
{"teemo": { "id": 35960410, "name": "Teemo", "profileIconId": 0, "revisionDate": 347299919000, "summonerLevel": 6} }
RiotSchmick
Request URL:
https://na.api.pvp.net/api/lol/na/v1.4/summoner/by-name/RiotSchmick?api_key=YOUR_API_KEY
Response Body:
{"riotschmick": { "id": 585897, "name": "RiotSchmick", "profileIconId": 682, "revisionDate": 1406832864000, "summonerLevel": 30}}
You can also call multiple information at once, such as https://na.api.pvp.net/api/lol/na/v1.4/summoner/by-name/Teemo,RiotSchmick,SmurfAccount,TSMDyrus?api_key=YOUR_API_KEY
Which would make a response body containing all four of those users, try it out!
One final thing for this section I would like you to see, is how this string looks when your program receives it. Pull up Teemo’s information again. Now copy the Request URL, and paste it right into your browser’s address bar. You will see the same information as above but all mushed into one solid and space’less string. This is how JSON looks, and now I shall show you how to both get that JSON data and let your application understand it.
NOTE: For this section I use a site called JSFiddle. JSFiddle lets you emulate scripting languages like Javascript, JQuery, and AJAX, and thus I can show you actual code examples that work! It is also a great place to simply test out API calls using the languages of this tutorial.
Check out this Summoner Look Up. Give it a try! Plug in your API Key and enter some summoner names for fun.
This is a very simple summoner look up. The top left box is for HTML, the bottom left box is for scripts, the top right is for CSS, and the bottom right is where you can actually see the result/view.
Hint: When testing JSFiddle code, always be sure click JSHint to make sure that your javascript is correct
The only thing to really notice here is that I give an “id” to each input and span tag. If you have not used HTML before, just know that I simply give elements an “id” to find them easier.
I also have a button with the attribute “onclick”, literally meaning go to do this when clicked. For this example onclick will activate function “summonerLookUp()”.
The first line you see says function summonerLookUp, which means that this snippet of code will run when the button is pressed (onclick=”summonerLookUp”). The first thing I do in this function is gather the data I need, the API key and the summoner name. I get those values with JQuery, and then I move into my AJAX ($.ajax) where I build the API URL and replace the braces {} with the entered information.
From this point the AJAX will then go to that url that I built and grab the data that we have been seeing in the past examples. For now you can ignore what follows but notice the success and error snippets, these will run the code within depending on if the URL worked (success) or not (error).
Within “success” the main concept I want you to understand is where I set summonerLevel = and summonerID =. This is where I actually decode the json and pull out the information that I want. This following string will grab the summoner’s level: json[SUMMONER_NAME_NOSPACES].summonerLevel.
So let’s say I had entered Teemo as the Summoner Name, the JSON to get his summoner level would then be json[teemo].summonerLevel, because SUMMONER_NAME_NOSPACES is just a variable that has been passed along containing the value of Teemo.
Summoner ID would be the same as well, json[teemo].id
Now let’s look at why this works for a second. Head back to the API Documentation. And pull up the Summoner information for Teemo. Notice how it is structured. The first item you see is “teemo” but afterwards you then see another “nest” or set of braces. Each further set of braces is an attribute of whatever is above it.
In this example, “teemo” has the attributes, “id”, “name”, “profileIconId”, “revisionDate”, and “summonerLevel”. Attributes are accessed with a period (.). Thus when I call json[teemo].id it gives me the attribute “id” of “teemo”
So what about this “json” that we keep seeing? json[teemo], well notice how in the Summoner Look Up the “success” function has “json” in parentheses. Whatever is in those parentheses is the JSON Object. This is the ENTIRE set of data that the url returns. As you build larger and more complex URL’s, you will begin to see how long some of these JSON strings can get and why they are all stored using attributes.
Head to this modified version of Summoner Look Up (JSON). Notice how I added two buttons. Enter in your key with summoner name Teemo, hit submit, then try the other buttons.
Notice what they return? One is unreadable Object, and the other is the JSON string of Teemo’s data.
Now look at the difference in the AJAX’s code. JSON_encoded is simply set to “json”, the Object that our URL gets. Since I am asking to see the whole Object, it has no idea what to do so it just returns a generic Object message. But when I ask to use JSON.stringify, I am telling Javascript to use one of its built-in JSON functions to decode the Object and stick it all into a string.
Likewise, we can also just pull the Object apart and get actual values. Here is another practice problem.
Look at Summoner Look Up Practice 1, try to modify the AJAX snippet and set “sumName” to the json’s value for Summoner Name.
Answer Summoner Look Up Practice 1 - Answer.
Try playing around with this snippet some more, and get the other attributes. Practice makes perfect!
The examples thus far have been pretty simple, so let’s look at nested data. As mentioned, each subset of braces represents an attribute, obviously all summoners only have one name, id, icon, ect.. So what about when you call api’s that have multiple items for attributes. Such as the summoner’s mastery page.
A summoners mastery page can be found by heading to the API Documentation and selecting Summoner then selecting /api/lol/{region}/v1.4/summoner/{summonerIds}/masteries, head to the bottom of that page and type in a summonerID, RiotSchmick’s ID happens to be 585897 (Fig. 4).

(Figure 4)
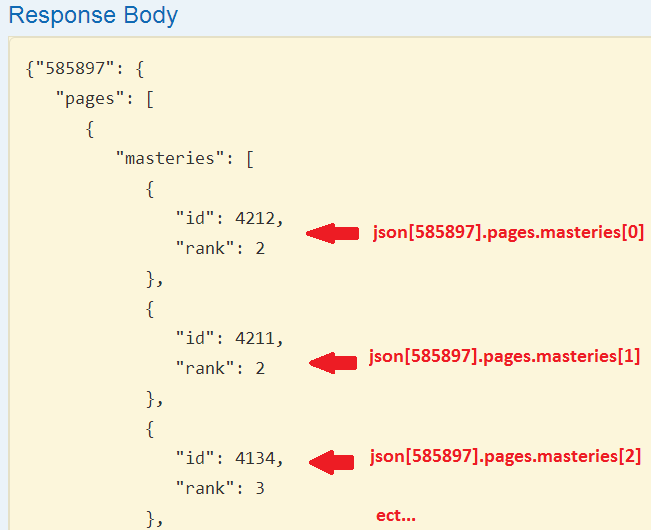
Let’s navigate this page now for his ID.
First we have his ID, 585897. In a “success(json)” statement this would be json[585897]. Notice that pages’ is nested within this ID? It is an attribute, and thus can be accessed as json[585897].pages.
Nifty huh! Well look, pages also has a nest of braces after it, meaning if we wanted to get to the attribute “masteries” of “pages”, what would we type in the success statement? . . . .
At this point you might be confused. Masteries has a nest as well, but there are multiple id’s and rank’s… how do you tell them apart? Well this is why JSON is so cool, it basically is a string full of “arrays”. If you are not familiar with arrays, they are basically collections of data, each value with an “index”.
If I wanted to get the first id and rank, I would just say the following. json[585897].pages.masteries[0], I say [0], because 0 is the first index in an array. If I wanted the second id and rank (4211, 2), then I would say json[585897].pages.masteries[1], and so on for any other items. (Fig. 5)
(Figure 5)
Most of the API’s data will have arrays and these arrays are what will contain all of the cool stuff to build your application.
Let’s look at another demo, Mastery Look Up
As you can see this contains both the original Summoner Look Up, along with two new output lines and a new function called letsGetMasteries.
Let’s walk through the function.
If you are looking ahead, you might be thinking either A. manually calling all of this stuff is going to be rough, or B how do I keep this dynamic. As in, if I have a program that asks for the first 10 pages, but a user only has 9, how do I for see this so my program will not crash.
Well Javascript has some nice functions to determine this ahead of time, like .length or foreach. Check out this example below where I utilize foreach to get all the names for a summoner’s mastery pages.
Everything is the same, except I added a foreach at the bottom of the masteries function. Carefully exam it. What foreach does, is look at everything with the preceding criteria, so when I say resp[summonerID].pages.forEach(function (item)), the program will say, ”Okay, I will look at each item IN pages IN this summonersID, and refer to that element as item”. AKA, item is “masteries”, as that is the attribute of “pages”.
Thus when I say item.name, this is actually saying resp[summonerID].pages.masteries.name. And since it is a foreach, it is really doing resp[summonerID].pages.masteries[0-length].name.
Pretty cool huh!
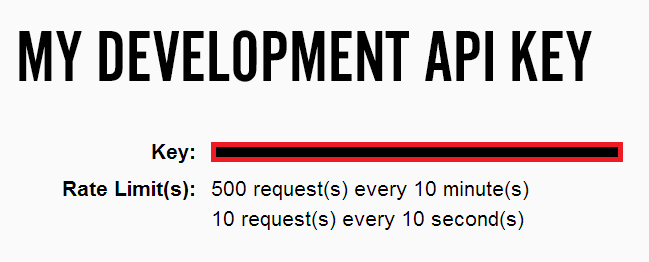
At the beginning of the tutorial I mentioned how RIOT can increase your “rate limit” if your application get approved. If you head back over to the dashboard You will see Rate Limit(s), what this means, is that you cannot exceed API URL call’s over that assigned limit.
For example, on our mastery look up, we make two API calls. One to summonerName, and one to summonerID/masteries. That is two calls. If we somehow looped that program to run 5x (or if 5 different user's ran this function at the same time), that would be 10 calls which would occur in under 10 seconds limit, meaning your application would then be blocked until that 10 seconds has passed due to the 10 calls per 10 seconds limit. (Fig. 6)
(Figure 6)
And once you do finish your awesome application, Riot can "approve" it, and give you higher rate limit with a special key assigned for that application. (Fig. 7)

(Figure 7)
It is your job as a developer to make wise use of your rate limits, especially if you will have multiple users potentially making calls all at once.
If you have been able to follow along then I think you are on a good foot to start exploring the other API’s. Learning JSON, is a trial and error thing, if you ever get stuck and become frustrated just head to the API Documentation, pull up the method you are using, and look at it carefully. Try visualizing the decode within your head and it will click, promise!
I hope you enjoyed this beginner tutorial, if you would like some more tutorials please comment and let me know. I am not the best teacher, but I enjoy this stuff. :D